2021-10-25
2017-03-05
Alexa Skills with Azure Function in PowerShell
Today it is an elementary task to create Microservices, I find the most challenging aspect the actual service idea.
Last year I purchased an Amazon Alexa, and soon after I decided to build an Alexa skill to automatically recommend a movie based on genre and play it.
While ostentatiously simple, I soon encountered a number of issues.
The 1st issue was unifying my movie services for available content resources, this ultimately made it impossible to publicly publish the skill.
The 2nd issue and the topic of the post was the certificate validation in PowerShell. I first started writing the skill in Node.JS, but the library at the time did not work correctly, and my weekend project soon entered the nasty world of debugging node packages. So I reverted to my scripting language of choice PowerShell :). Actually writing the skill text is easy, I used the TheMovieDB which required some service location testing to reduce latency, but it provided the bulk speech output.
An Alexa Skill is essential a web service which return JSON strings representing what you want Alexa to say... super easy, but they also use hash-based messaging code (HMAC) to sign the request. HMAC is a specific type of message authentication code (MAC) involving a cryptographic hash function and a secret cryptographic key. HMAC is a method extensively used by Amazon’s S3, Alexa, and other APIs for AWS and in parts of the OAuth specification. With HMAC the body request along with a private key is hashed, and the resulting hash is sent along with the request. The server then uses its own copy of the private key and the request body to re-create the hash. If it matches, it allows the request. This prevents man in the middle interference with the request, as the hash will not match and the server knows the request has been tampered with. And the private key is never sent in the request, so it cannot be compromised in transit.
Like most I google'd HMAC MAC PowerShell, but to no avail, so I asked on Stack, and ultimately had to write my own function...
The requirements to validate the REST request are detailed on Amazon's Developer Portal but in brief:
- Get the Certificate and validate it
- Validate the source of the Certificate and the request
- Validate the signature of the request, and compare it to the body
function verifySign($Json)
{
#Bypass validation
if($bDebug)
{
return $true
}
try
{
#Assign variable
[DateTime]$timestamp = $Json.requestBody.request.timestamp
[System.Uri]$awsUrl = $Json.signaturecertchainurl
$now = Get-Date
}
catch
{
return "Bad JSON request"
}
#start request validation
#check request is less than 150sec old
if($(New-Timespan -Start $timestamp -End $now).TotalSeconds -gt 150)
{
$validErr += "`nRequest Timestamp out of bounds."
}
#check certificate comes from amazon
if($awsUrl.Host -ne "s3.amazonaws.com")
{
$validErr += "`nCertificate invalid host name."
}
#check certificate is on 443
if($awsUrl.Port -ne 443)
{
$validErr += "`nCertificate invalid protocol."
}
#check path is correct @ AWS
if($awsUrl.LocalPath -cnotmatch "/echo.api/")
{
$validErr += "`nCertificate invalid path"
}
#get signature from HTTP headers
try
{
$encryptedSignatureBytes = [System.Convert]::FromBase64String($REQ_HEADERS_SIGNATURE)
}
catch
{
$encryptedSignatureBytes = $false
}
if(!($encryptedSignatureBytes))
{
$validErr += "`nSignature not provided or invalid."
}
else
{
#define path for downloading Cert
$dlPath = "$cd\echo-api-cert-4.pem"
if(!(Test-Path $dlPath))
{
Invoke-WebRequest -Uri $awsUrl.AbsoluteUri -OutFile $dlPath
}
#Load Cert
$cert = Get-PfxCertificate -FilePath $dlPath
#Generate a SHA-1 hash value from the full HTTPS request body to produce the derived hash value
$requestBodyBytes = [System.IO.File]::ReadAllBytes($req)
$sha1Oid = [System.Security.Cryptography.CryptoConfig]::MapNameToOID('SHA1')
#Compare the asserted hash value and derived hash values to ensure that they match
if(!($cert.PublicKey.Key.VerifyData($requestBodyBytes, $sha1Oid, $encryptedSignatureBytes)))
{
$validErr += "`nFailed request hash comparison to signature."
}
#Validate Cert date
if(($now -lt $cert.NotBefore) -or ($now -gt $cert.NotAfter))
{
$validErr += "`nCertificate out of date."
}
#Verify Cert
if(!($cert.Verify()))
{
$validErr += "`nCertificate validation failed."
}
#Check Cert domain match Amazon
if($cert.DnsNameList -cnotmatch "echo-api.amazon.com")
{
$validErr += "`nCertificate invalid domain SAN."
}
}
#return an error list or true; :) I don't even have to overload this method LOVE PS!
if($validErr)
{
return $validErr
}
else
{
return $true
}
}
#pass the request in to the function
$validRtn = $(verifySign $($requestCertBody | ConvertFrom-Json))
if($validRtn -eq $true)
{
switch($requestBody.request.intent.name)
{
"AMAZON.HelpIntent"
{
$outJson = $(Get-HelpIntent)
}
("AMAZON.StopIntent")
{
$outJson = $(Get-StopIntent)
}
("AMAZON.CancelIntent")
{
$outJson = $(Get-StopIntent)
}
default
{
$outJson = $(Get-Recommendation $requestBody)
}
}
}
else
{
$certFail = @"
{{"Status":"400","Headers":{{"content-type":"application/json"}},"Body":{{"Status":"{0}"}}}}
"@
$outJson = $certFail -f $validRtn
}
2016-10-18
Turn on/off any PC with an ATX PSU and InfraRed remote
My HTPC has/had a CIR which allowed me to turn it on via my Harmony remote, but one day it stopped working and my attempts to fix it totally broke it.
So my 1st idea was I'll buy a new CIR device, but I couldn't find any.
My 2nd idea was get a new Motherboard, but that meant new CPU (Skylake i7-6700k) + RAM (DDR4) bcos there's no point getting a new Mobo if your not getting the latest and greatest, and I couldn't find any which turned on via IR.
My 3rd idea was build something :), this turned out to be ridiculously easy.
What would I need? Some way of automating pressing the button for 2 seconds, bcos that turns the PC on and off, and something to accept an IR signal.
I knew ATX PSU's have a 5v standby power supply, so IR relay would need to operate on 5v.
A quick google didn't help, so I went to Alibaba and found exactly what I was looking for, a 5v IR relay with timer function. I then went to eBay bcos I prefer the buying experience. Found the same 5v Programmable relay for $5 how awesome is that!?
3 weeks later it arrives and I proceed to install it.
Steps:
So my 1st idea was I'll buy a new CIR device, but I couldn't find any.
My 2nd idea was get a new Motherboard, but that meant new CPU (Skylake i7-6700k) + RAM (DDR4) bcos there's no point getting a new Mobo if your not getting the latest and greatest, and I couldn't find any which turned on via IR.
My 3rd idea was build something :), this turned out to be ridiculously easy.
What would I need? Some way of automating pressing the button for 2 seconds, bcos that turns the PC on and off, and something to accept an IR signal.
I knew ATX PSU's have a 5v standby power supply, so IR relay would need to operate on 5v.
3 weeks later it arrives and I proceed to install it.
- Test relay to ensure it works.
- Program your universal IR remote unless you want to use the included one. My Harmony Elite had a really hard time learning the IR command, and even when it did it wouldn't work the 1st time, but it eventually learnt the command.
- Set relay time to 2 seconds, shorter will turn it on, but may not turn it off. 4 seconds will force a power cut.
- If required extend the infrared phototransistor, black shiny thing with 3 pins. I extended mine by 30cm to have it sit outside the case.
- Either find 5v on a motherboard USB pin header (I used the USB2 header as pictured and I had to enable Asmedia USB 3.1 battery in the BIOS to have 5v constantly supplied to the relay) or get it directly from the ATX connector.
- Supply 5v to the IR relay power input.
- Run 2 wires from relay output NO (normally open) + COM to the Power Switch pins on your motherboard front panel pins.
- T join the case front panel power switch to the Power Switch pins on your motherboard or join them on the relay (pictured) so you can still use the normal power switch.
- Test. Apart from the Harmony learning command issue, it has worked flawlessly for the past 2 weeks (update: +2 years) and I like that it turns off instead of the Alt+F4 I used to do. I even use an Amazon Echo + Harmony to voice control it with; Alexa, turn PC on/off.
 |
| Relay with extended phototransistor |
 |
| T/Y join of front panel I/O + Relay NC/COM |
 |
| The relay on top of the PSU in the case |
Labels:
Home Automation
2016-09-27
Microsoft SharePoint (Unreleased) for Android.
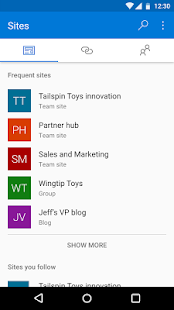
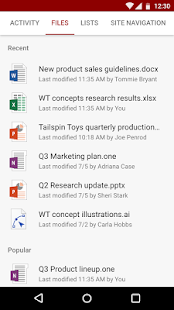
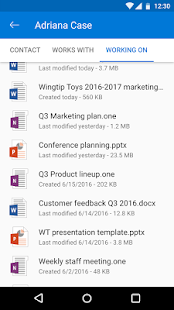
Some of us can't stand iOS but there's no denying it's the primary mobile platform and it has a SharePoint. Microsoft's just released an early access version of the Andoird app on the Play Store.
The SharePoint app includes all the things you'd expect to find - managing team sites, document storage, Office 365 integration, and collaboration features with other team members. Documents can be edited with the Office Mobile apps (Word, Excel, PowerPoint, and OneNote), making for easy updating on your Android phone or tablet. The app is powered by Microsoft Graph, which "makes it faster to get to content and people you work with".


The SharePoint app includes all the things you'd expect to find - managing team sites, document storage, Office 365 integration, and collaboration features with other team members. Documents can be edited with the Office Mobile apps (Word, Excel, PowerPoint, and OneNote), making for easy updating on your Android phone or tablet. The app is powered by Microsoft Graph, which "makes it faster to get to content and people you work with".
Labels:
SharePoint
2016-06-30
PowerShell function to create Azure ARM VM with Public IP
This function is intended to reside within the logic of a larger script for deploying an entire resource group. The function should ideally be fed from a JSON or XML configuration file.
It takes a whole bunch of inputs relating to Azure VMs and provisions a VM within a resource group and VNet with a public IP. The Network Security Group settings need to be amended as required.
I've extracted some of the required variables, but these could also be passed as parameters.
It takes a whole bunch of inputs relating to Azure VMs and provisions a VM within a resource group and VNet with a public IP. The Network Security Group settings need to be amended as required.
I've extracted some of the required variables, but these could also be passed as parameters.
[string]$resGroup = "IIOS"
[string]$location = "australiaeast"
[int]$script:ipStart = 4
[string]$saName = $($saName -creplace '[^a-zA-Z0-9]','').ToLower()
[string]$vnName = $($resGroup +"-vNet1")
function Create_VMRole([string]$vmName, [string]$vmSize, [string]$vmDesc, [int]$dataDiskSize, [string]$PublisherName, [string]$Offer, [string]$Skus)
{
while(($vmName.length -gt 15) -or !$vmName){
Write-Host "Virtual Machine Name '$vmName' is too long or empty" "Yellow"
[string]$vmName = read-host "Please enter a valid Virtual Machine Name..."
Write-Host "`nYou entered '$vmName'`n" "Yellow"
}
Write-Host "[CREATING] $vmDesc Virtual Machine '$vmName'"
$vmAvailabilitySet = $($vmName +"AvailabilitySet")
if(!($vmSet = Get-AzureRMAvailabilitySet -Name $vmAvailabilitySet -ResourceGroupName $resGroup))
{
Write-Host "[CREATING] AvailabilitySet '$vmAvailabilitySet' for $vmDesc Virtual Machine '$vmName'"
$vmSet = New-AzureRMAvailabilitySet -Name $vmAvailabilitySet -ResourceGroupName $resGroup -Location $location
}
$vnet = Get-AzureRMVirtualNetwork -Name $vnName -ResourceGroupName $resGroup
Write-Host "[CREATING] PublicIpAddress for '$vmName'"
$pip = New-AzureRMPublicIpAddress -Name $($vmName +"-PublicIP1") -ResourceGroupName $resGroup -Location $location -AllocationMethod Dynamic
$nicIP = $("10.0.0." + $script:ipStart++)
Write-Host "[CREATING] NetworkInterface with PrivateIP '$nicIP' for '$vmName'"
$nic = New-AzureRMNetworkInterface -Name $($vmName +"-NIC1") -ResourceGroupName $resGroup -Location $location -SubnetId $vnet.Subnets[0].Id -PublicIpAddressId $pip.Id -PrivateIpAddress $nicIP
$vm = New-AzureRMVMConfig -VMName $vmName -VMSize $vmSize -AvailabilitySetId $vmSet.Id
$storageAcc = Get-AzureRMStorageAccount -ResourceGroupName $resGroup -Name $saName
if($dataDiskSize -gt 0)
{
$vhdURI = $($storageAcc.PrimaryEndpoints.Blob.ToString() + "vhds/" + $vnName +"-"+ $vmName +"-Data1.vhd")
Add-AzureRMVMDataDisk -VM $vm -Name "Data1" -DiskSizeInGB $dataDiskSize -VhdUri $vhdURI -CreateOption empty
}
$vm = Set-AzureRMVMOperatingSystem -VM $vm -Windows -ComputerName $vmName -Credential $vmCred -ProvisionVMAgent -EnableAutoUpdate #-TimeZone $TimeZone
$vm = Set-AzureRMVMSourceImage -VM $vm -PublisherName $PublisherName -Offer $Offer -Skus $Skus -Version "latest"
$vm = Add-AzureRMVMNetworkInterface -VM $vm -Id $nic.Id
$osDiskUri = $($storageAcc.PrimaryEndpoints.Blob.ToString() + "vhds/" + $vnName +"-"+ $vmName +"-System.vhd")
$vm = Set-AzureRMVMOSDisk -VM $vm -Name "System" -VhdUri $osDiskUri -CreateOption fromImage
$newVM = New-AzureRMVM -ResourceGroupName $resGroup -Location $location -VM $vm
return $newVM
}
Example usage:
Create_VMRole "dbVM1" "Standard_D3_V2" "SQL Server Primary" 300 "MicrosoftSQLServer" "SQL2014SP1-WS2012R2" "Standard"
Labels:
Azure
,
PowerShell
2016-01-10
PowerShell function to Get Term from SharePoint Term Store
Very useful if you're updating taxonomy fields.
Takes 3 inputs; the Site URL, the Taxonomy field object and the Term string.
The function gets a reference to the site's term store and then executes the GetTerm method, (more info here: TermSet.GetTerms) and finally return a Term object.
Takes 3 inputs; the Site URL, the Taxonomy field object and the Term string.
The function gets a reference to the site's term store and then executes the GetTerm method, (more info here: TermSet.GetTerms) and finally return a Term object.
function GetTerm([string]$siteUrl, [Microsoft.SharePoint.Taxonomy.TaxonomyField]$oField, [string]$termStr)
{
if(!$oField.IsTermSetValid)
{
Write-Host "[ERROR] $($oField.Title) IsTermSetValid is FALSE"
return $null;
}
$taxonomySession = Get-SPTaxonomySession -Site $siteUrl;
if(($taxonomySession -eq $null) -or ($taxonomySession -eq $null))
{
Write-Host "[ERROR] Taxonomy Session is null, Metadata Service App Proxy default storage location for column specific term sets is CHECKED and the user account has access"
return $null
}
$oTermStore = $taxonomySession.DefaultSiteCollectionTermStore;
if($oTermStore -eq $null)
{
$oTermStore = $taxonomySession.TermStores[0];
}
if($oTermStore -eq $null)
{
Write-Host "[ERROR] Unable to get a valid Term Store.`nEnsure $(whoami) is a Term Store administrator.`nEnsure the Managed Metadata Service Proxy property 'This service application is the default storage location for column specific term sets.' is checked." Red
exit
}
$oTermSet = $oTermStore.GetTermSet($oField.TermSetId);
[System.Guid]$gTermId = $oField.AnchorId;
[int]$LCID = 1033;
if(($gTermId.ToString() -eq "00000000-0000-0000-0000-000000000000") -or ($gTermId -eq $null))
{
$oTerm = $oTermSet.GetTerms($termStr, $LCID, $true)[0];
if($oTerm -eq $null)
{
Write-Host "[ERROR] Term value: $termStr not found in TermSet $($oTermSet.Name)" Red
}
}
else
{
$oAnchorTerm = $oTermSet.GetTerm($gTermId);
$oTerm = $oAnchorTerm.Terms[$termStr];
if($oTerm -eq $null)
{
Write-Host "[ERROR] Term value: $termStr not found in $($oTermSet.Name);$($oAnchorTerm.GetPath())" Red
}
}
return $oTerm
}
Below is an example of how to use the function and the returned Term object to set the default value for a field.
$oField = $oWeb.Fields.GetField("Document Type")
$oTerm = GetTerm $oWeb.Site.Url $oField "Proposal"
if($oTerm -ne $null)
{
$taxonomyValue = New-Object Microsoft.SharePoint.Taxonomy.TaxonomyFieldValue($oField);
$taxonomyValue.TermGuid = $oTerm.Id.ToString();
$taxonomyValue.Label = $oTerm.Name;
$oField.DefaultValue = $taxonomyValue.ValidatedString;
$oField.PushChangesToLists = $true
$oField.Update($true)
Write-Host "Setting Default Value $($oField.TypeAsString):$($oField.Title) : '$($taxonomyValue.ValidatedString)'" Yellow
}
Labels:
PowerShell
,
SharePoint Programming
2016-01-02
Subscribe to:
Posts
(
Atom
)


